Personalization at scale is the north star for customer-obsessed brands today (and any brand with a growth plan has likely embraced customer obsession). It’s the ability to deliver a unique experience tailored to the circumstances, values, and behavior…
Personalization at scale is the north star for customer-obsessed brands today (and any brand with a growth plan has likely embraced customer obsession). It’s the ability to deliver a unique experience tailored to the circumstances, values, and behaviors of an individual – that meets them where they are in the context of a specific moment in their journey and responds to each next step.
We listen to the news and hear that some areas of the US are paying $3 more for a gallon of gas than other places. So intuitively, we understand that different parts of the country are impacted differently when it comes to inflation.
We listen to the news and hear that some areas of the US are paying $3 more for a gallon of gas than other places. So intuitively, we understand that different parts of the country are impacted differently when it comes to inflation.
Improve the accessibility of your online store using these strategies, recommended by Zack Poelwijk of ABILITY.
According to the CDC, 26% of American adults have a disability — a whopping 61 million people who have a combined disposable income of about $480 billion.
Although many countries, including the United States, have laws about accessibility (like the Americans with Disabilities Act [ADA] of 1990), accessibility-compliant eCommerce sites are few and far between.
This is a huge disappointment for people who fall into this demographic — and a giant opportunity for your brand to level up and better serve your potential and existing customers.
In this guide, we’ll share a few recommended strategies from Zack Poelwijk, Director of Customer Success at ABILITY Digital Accessibility Co, that will help you reach a bigger audience, improve your accessibility features, and bring your online store closer to ADA compliance.
As a bonus, these easy upgrades not only help your customers with disabilities, but they’ll benefit your overall SEO strategy, too!
Let’s get started.
What is Online ADA Compliance?
When we think of ADA compliance, we often recall the ramps installed where stairs are present in a building or braille printed on signs that point to bathrooms.
But what about online ADA compliance?
When it comes to accessible websites, eCommerce businesses need to think about customers with all sorts of abilities and support systems like screen readers, closed captions, and keyboard-only access.
For example, users of a website who are on the visually impaired and color-blindness spectrum most likely use a screen reader or require larger font. Some people may not be able to use a mouse and can only navigate websites with a keyboard. Customers with cognitive impairments may need more time to process information before a decision can be made.
In other words, as Poelwjik describes, digital accessibility is “the philosophy of ensuring that digital assets are built in a manner, or retrofitted in a manner, to be accommodating to [various assistive technologies for customer usability].”
What ‘Compliance’ Means
Online accessibility is ultimately defined by one set of rules: the Web Content Accessibility Guidelines, also known as the WCAG.
This single point of truth for global accessibility standards makes it much easier for brands worldwide to achieve these goals, while simultaneously keeping complicated government speak out of the equation.
When it comes to ADA compliance, there are three different levels that companies can achieve:
A: This is considered the bare minimum standard a website must meet.
AA: Reaching this mid-range level ensures that your website is built to avoid the biggest, most frequent barriers for disabled users.
AAA: This is the highest achievable standard and can actually be impossible for some websites to reach, depending on their content types.
Why It Matters
Digital accessibility is important from two main standpoints: altruism & legality.
Altruistically, providing alternative, equitable outcomes to people with disabilities is part of the fabric of our communities.
Legally, we live in the most litigious society in all of history, which means accessibility lawsuits are common. In short, your company could be sued if it does not provide equitable service to all of your customers, regardless of ability — and there are plenty of lawyers waiting in the wings to make it happen.
By committing to an eCommerce site with improved accessibility, you’ll provide more shopping opportunities for often-overlooked audiences. In return, they’ll be more likely to frequent your online store out of ease of use.
Finally, improving the user experience for impaired customers improves the user experience for non-impaired customers, too. (We’ll discuss more on that below). In turn, this can boost SEO performance and overall revenue for retailers like you.
eCommerce Website Accessibility Best Practices
When it comes to accessibility for eCommerce websites, there’s one question to answer:
What additional accommodations are needed for a customer with disabilities to navigate a website, find the products they want, add them to the cart, and check out effectively?
The following suggestions are based on a few of the standards ABILITY highlights for anyone looking to improve online accessibility.
This is a great starting point, but it’s not a comprehensive list. We recommend that your brand conduct thorough accessibility testing to identify every issue on your site and create a plan of action.
Only that way can you ensure the best user experience for your prospective shoppers.
1. Color Contrast
Visual impairments fall among the most common disabilities. Luckily, providing proper solutions for these users is fairly easy.
By ensuring adequate color contrast anywhere text is present, you can alleviate many of the stressors that vision-impaired customers face.
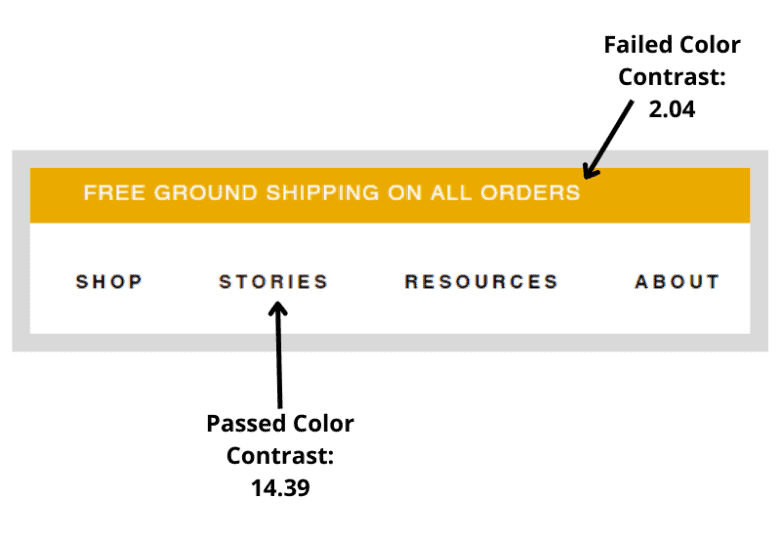
Adequate contrast is measured by comparing the color of your font against its background. This ratio is also determined by the size of the font. Standard size font needs a color contrast ratio of 4.5:1; for large or bolded font, you only need a 3:1 color contrast ratio.
Keep in mind that this high-contrast rule applies to everything— infographics, promotional text superimposed over an image, marketing brochures, product shot sheets, etc.
Use a tool like the WebAIM Contrast Checker to check your font size vs. contrast ratio to understand your current contrast and mark which parts of your site need improvement.
2. Image Alt Text
In addition to proper color contrast, you must ensure that all images on your site include alt text.
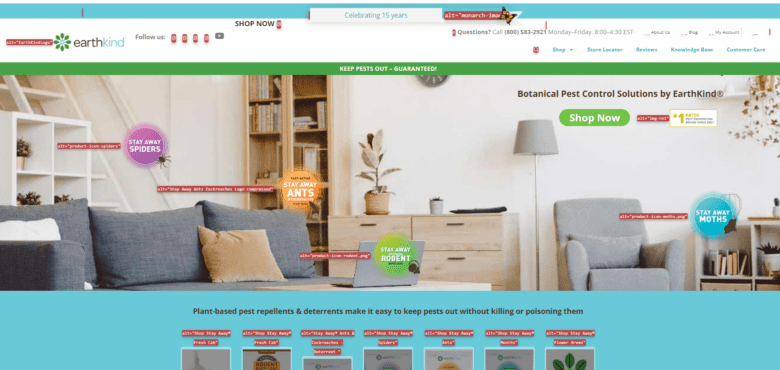
Alt text describes an image to your visitors so if they are visually impaired, they can still understand the content on your site. This is especially important in cases like infographics and product descriptions.
Without alt text, your customers could miss crucial details about your products or important context on your webpage.
Decorative images are the exception to this requirement. But we recommend using alt text for all images to provide a fuller experience to your website visitors.
You can use software like Chrome’s Web Developer Plugin to view current alt text on your website. Watch our video below for a quick walkthrough of how it works.
The video below is hosted on YouTube. If you need assistance with viewing the video, please contact [email protected].
3. Tab Navigability & Visual Focus Indicator
After visual impairments, mobility differences are some of the most common barriers for website users.
Able-bodied people use a mouse to navigate screens and websites and shopping situations — but what about those customers who can’t use a mouse? Many of them use the tab and directional keys to maneuver the internet.
Everything on a website that you’d otherwise be able to interact with using your mouse — links, buttons, and anything that is clickable, actionable, and takes you somewhere — needs to be just as functional by using only the tab key.
When building this functionality, keep in mind that clicking the tab key should navigate a user through a website from left to right, top to bottom.
For example, your users should be able to move from your homepage to a product page with the tab key. Then, within that product page, they must also be able to select the size, color, and any other details of the item they are trying to purchase.
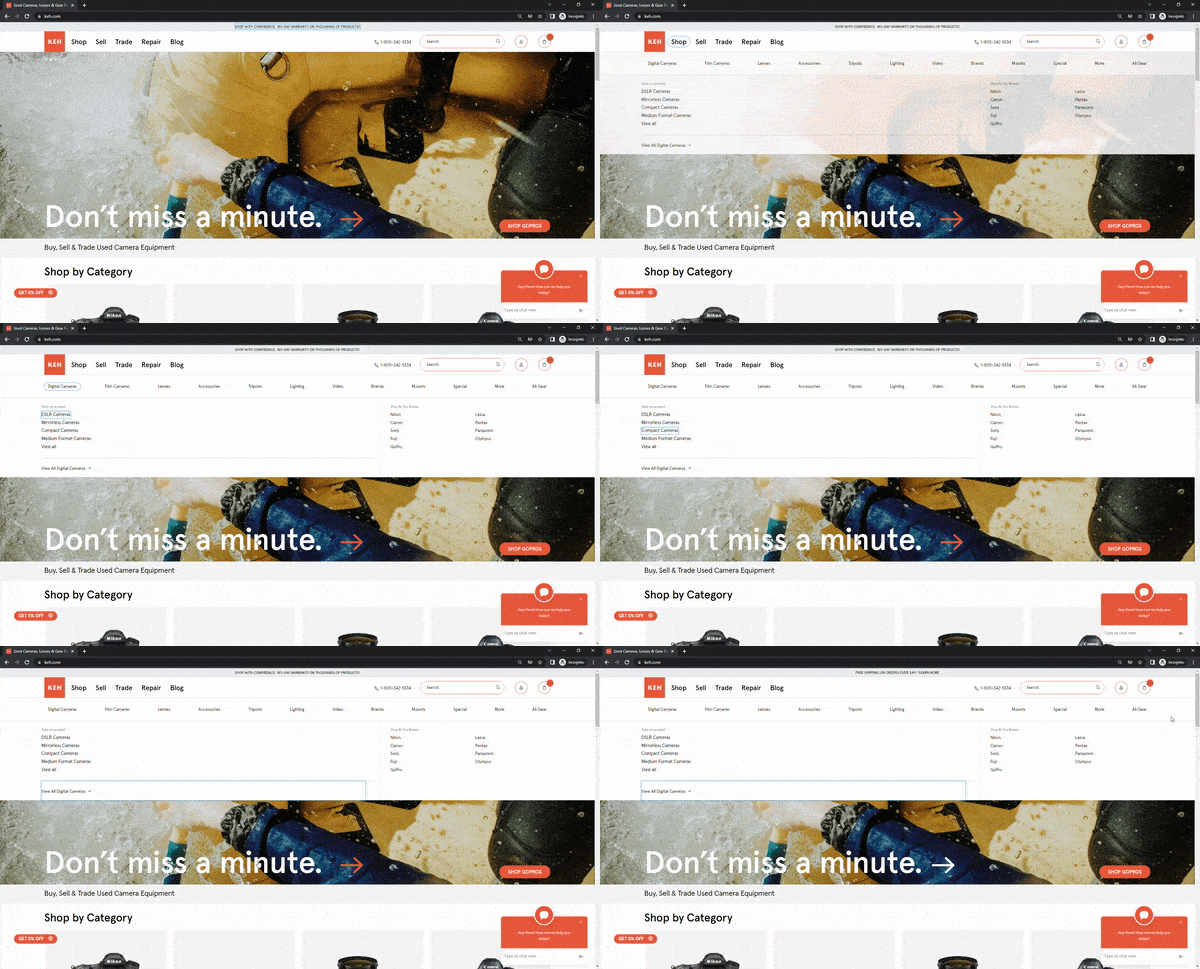
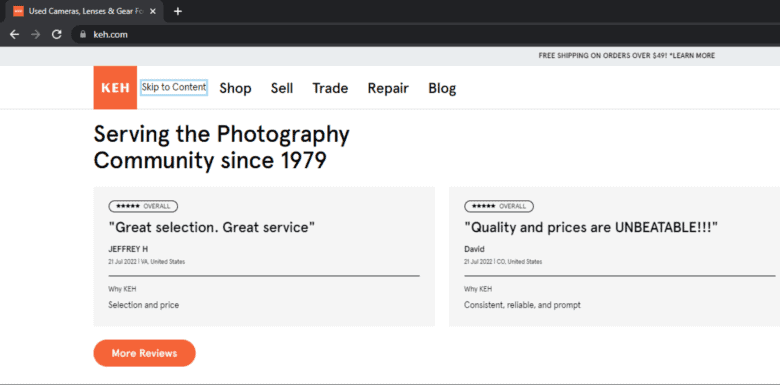
In addition to that capability, the user also needs a visual focus indicator, so that they can see their progress on the page. Usually, this is a color change in text or a dotted line box around the current selection.
You can accomplish this through CSS, which is a simple, superficial, top-level code change.
4. Programmatically Determinable
All of the elements of your webpage need to clearly show the user what the object is and what they are supposed to do with it. Generally, you can make this happen in the user interface development process.
To ensure accessibility, all of these same things have to be programmatically determinable. In other words, screen readers and other assistive technology must be able to understand what each piece is.
When a webpage is programmatically determinable, it means that a screen reader can read a piece of code to identify what the thing/button/etc. is, along with its clearly identifiable, accessible name (the label we have given that thing in the code) that it shares with the user.
For most eCommerce sites, this step can be completed with the help of an experienced web developer.
5. Finalizing the Purchase
Once your customers can maneuver your eCommerce website with tab navigability, you must ensure that they can finalize the purchasing process with similar ease.
Your users should be able to fill and check out an online shopping cart through the help of their assistive technologies (and without using a mouse). For eCommerce sites, this can get complicated, because there are so many details involved in the checkout process and so many places things can go wrong.
From filling out forms to entering credit card numbers to verifying all the details, your brand needs to prioritize accessibility in the checkout process. Not only will this ensure your site meets WCAG guidelines, but it also prevents you from losing that valuable sale!
Again, we recommend hiring an experienced accessibility developer to make necessary improvements to your checkout process.
6. Fillable & Form Fields
When it comes to the online shopping checkout processes, fillable fields and form fields present a unique challenge.
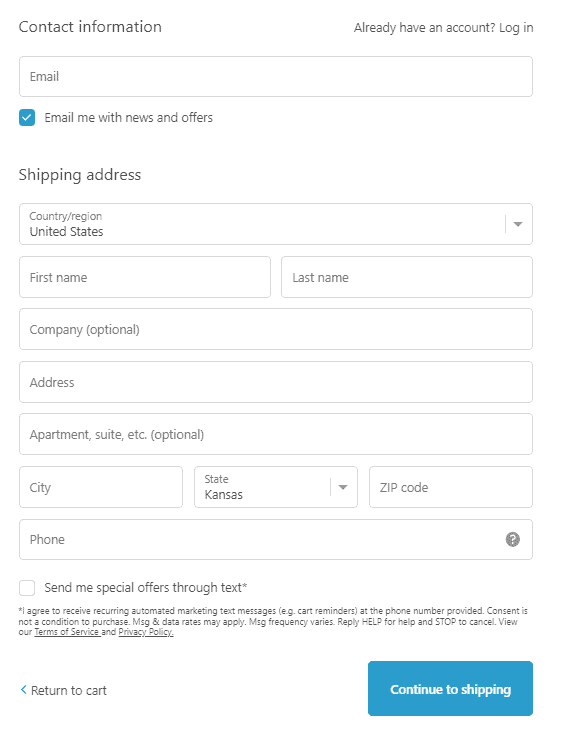
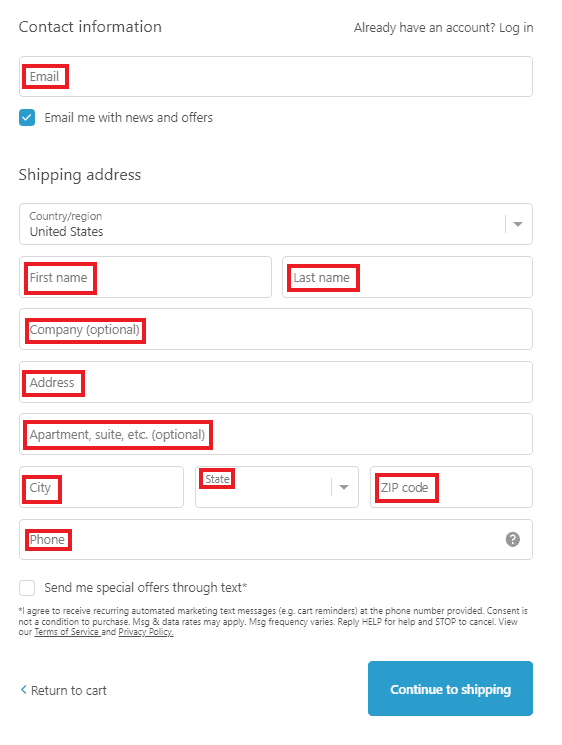
Each of these fields has very specific requirements and rules to follow. Making these rules known to your users and their support systems requires that every detail be programmatically labeled behind the scenes.
Some fields will require numbers and others letters, while some will allow for both. These need to be as detailed as possible. You’ll also need to name each field, so that technologies can identify them for users — First Name Field, Last Name Field, etc.
All of these labels can be created with simple HTML manipulation.
Don’t forget: You’ll also need to check color contrast and tab navigability with the visual focus indicator for each piece — so that your user and their support systems know where in the form they are, too.
Error messages also need to be made available to screen readers. These messages should have all the same accessibility traits, as well.
7. Mobile Responsiveness
How many of us use our phones for online shopping — whether we have an impairment or not? (Answer: About 36% of us.)
But, just like any able-bodied users, many users with disabilities primarily or only use their phones or tablets to surf the web or make online purchases. Therefore, it’s critical that your site be built to be responsive to their needs.
According to the WCAG, all web content needs to be able to elegantly stack to one column. (The association provides rules on how to do this with guidelines around pixel width and more.)
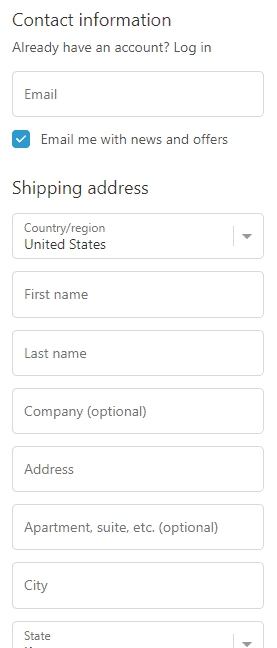
In this mobile version of the form shown above, all columns have collapsed into one for a better user experience.
Unfortunately, some digital objects (like clothing size charts or large graphs and images) can’t necessarily be shrunk down to become mobile-sized. For example, big tables can’t be re-sized to be mobile-responsive and shrink to fit the screen because then, well, they’d become unreadable.
To make these elements accessible and responsive, you build your mobile web design in such a way that mobile users can scroll in only one direction at a time — either up and down or side to side — so as to keep the information readable.
Starting Your Accessibility Initiative
The tips above are a good place to start when it comes to creating an ADA-compliant eCommerce website for your customers.
That said, following these rules alone will not automatically designate “full compliance” for your site. Instead, you may need to bring on more tools and services to ensure complete accessibility, provide the best experience for all of your users, and avoid litigation.
For brands looking to upgrade their customer experience, there are two main solutions available.
Overlay Widgets
The first is to implement an overlay widget. These accessibility tools typically provide an accessibility icon that appears in the top corner of the site. If users click on them, the tool can provide some additional information and usability.
Often, these overlays don’t produce the wide array of results they promise, so we don’t recommend relying solely on these for your accessibility needs.
If you’re just getting started with accessibility and your budget is very low, they can be a temporary bandaid — but should not be trusted as the end-all-be-all of your site’s accessibility.
Full Accessibility Audits
The second solution is to conduct a detailed, person-led eCommerce accessibility audit.
These audits are a much better way to ensure your company is in full accessibility compliance. If you want to reduce your risk, keep lawyers away, and sincerely make your site user-friendly to your entire target audience, an audit is the best solution.
Fortunately, there is a range of audit companies out there for every need and budget:
ABILITY provides a full suite of accessibility services that cover all of your digital assets. They offer an overlay product, as well as auditing, transcripts, closed captions, audio descriptions, and a compliance certification.
Deque also offers a remediation overlay, along with audits and training for your in-house team to ensure that any further developments are made with accessibility in mind.
UserWay provides a widget alongside their auditing services. They also can check for contrast and dyslexia font issues, as well as moderate your content.
If you’re already working with a digital marketing agency, they may have a partnership program with an accessibility service — so it’s worth asking if they have any recommendations for you, as well.
Improve Your Revenue with Your Accessibility Strategy
Improving your eCommerce website’s accessibility will not only help you reach new customers, but it will also actually help your current customers more easily navigate your site. In addition, these updates can drastically improve your technical SEO strategy.
In short, following the steps above can lead to greater revenues, market share, and conversions for your eCommerce store.
By streamlining your accessibility, you can outshine your competitors and draw in a loyal customer base. When people find online stores that are easy to navigate and buy from with clear access, they keep coming back — and you’ll reap the rewards.
Want a digital marketing strategy that addresses these accessibility issues and improves your online revenue? Request a free customized proposal from Inflow today to learn more.
If you want to start improving your site’s accessibility with a more DIY approach, we recommend the following resources:
Leaders in the retail space gathered in New York last week for Adweek’s Commerce Week to discuss the rapidly evolving retail space and share perspectives and learnings. The keynote list was comprised of speakers representing brands, retailers, agencies…
Leaders in the retail space gathered in New York last week for Adweek’s Commerce Week to discuss the rapidly evolving retail space and share perspectives and learnings. The keynote list was comprised of speakers representing brands, retailers, agencies, and leading retail ad tech partners.
Despite rapid change, many retailers and brands are still struggling to adapt. Established organizations are built off 50-100 years of legacy retail structures, and it’s only been 28 years since the online marketplace experience (Amazon/Ebay) launched.
If you’re looking to fill any gaps in your Q4 planning, there is still time to launch a chance-to-win promotion for the holidays that will help you do the following:
If you’re looking to fill any gaps in your Q4 planning, there is still time to launch a chance-to-win promotion for the holidays that will help you do the following:
Learn how to set up your Google Analytics 4 eCommerce tracking before the July 1, 2023, deadline.
It’s time to get tracking.
With Universal Analytics’ final goodbye less than a year away, the clock is ticking on your deadline to set up Google Analytics 4. To prep your business for success before next July, you need to get your GA4 properties in order — and tracking — as soon as possible.
For the last few months, our marketing team has worked diligently to transition our eCommerce clients from UA to GA4. Along the way, we’ve learned some tips and tricks for a smooth migration that captures everything a business needs to bring from Universal Analytics.
In today’s guide, we’re sharing that process with you, including a helpful GA4 eCommerce Tracking Toolkitto kickstart your efforts. Read through it now to start configuring your own accounts, or to give your agency a headstart with its operations.
And, if you ever need help with your Google Analytics 4 setup, Inflow is always here.
How Google Analytics 4 Tracking Differs From Universal Analytics
Before we get into the details of setting up Google Analytics 4 tracking, you need to understand the crucial difference between this platform and Universal Analytics.
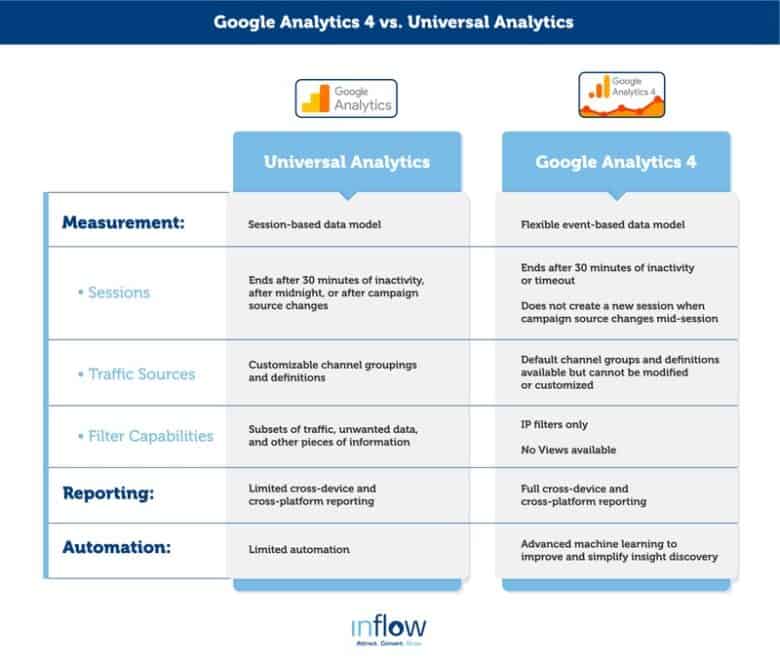
GA4 is more than just an “upgraded” version of UA. It’s a completely redesigned system with a totally different approach to event and conversion tracking. Whereas UA tracked events as different “hit” types (page views, events, transactions, etc.), Google Analytics 4 tracks them all as an “event” — which means you’ll need to do some additional configuration for the most accurate data collection.
You can learn more about how GA4 differs from UA in Google’s complete guide, or you can check out our infographic below for the quick hits:
If you haven’t yet read our introduction to Google Analytics 4, we recommend you do so now, to familiarize yourself with the platform. You can also watch our explanatory video below:
The video below is hosted on YouTube. If you need assistance with viewing the video, please contact [email protected].
How to Set Up Google Analytics 4: The Basics
Before setting up your data tracking, you must first configure your Google Analytics 4 property.
If you haven’t yet done so, follow the steps below to get started. (You can also follow Google’s Setup Assistant within the platform.)
Step 1: Create Your New GA4 Property.
The first step to your GA4 tracking — make sure you have a property to track with!
You can easily create a Google Analytics 4 property for each of your existing Universal Analytics properties. After hitting “Create Property,” follow these steps to complete the process.
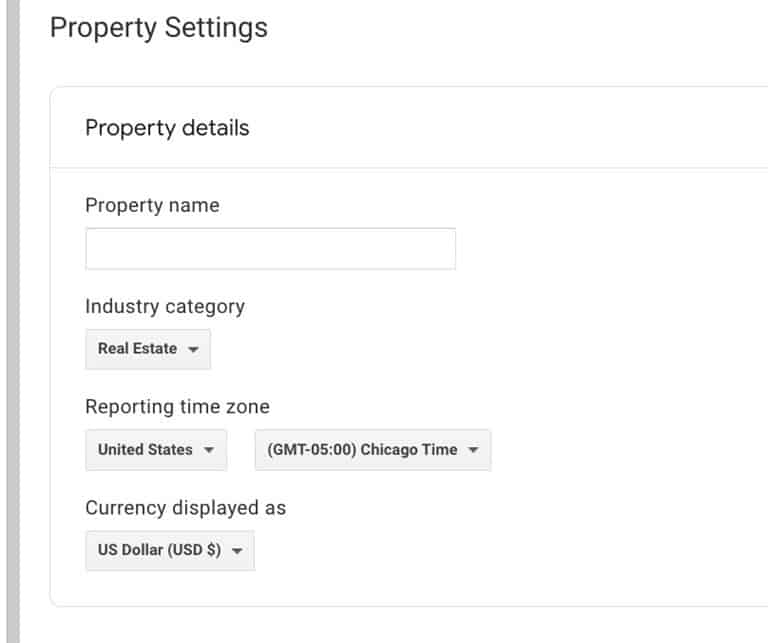
Click on “Property Settings” in the lefthand navigation menu.
Fill out the details for the Property as accurately as possible.
At this point, you’ll have your basic property created and populated with the must-have info. But there are a few other steps involved before you can configure your tracking.
Step 2: Set Up and Connect BigQuery Data Warehouse.
Remember that Google Analytics 4 is limited to a 14-month data retention period. Therefore, to store your long-term historical data, you’ll need to use a data streaming warehouse.
Here at Inflow, we’ve been using BigQuery for our clients, because GA4 provides an easy connection to the platform. It’s also free or very low-cost for many of our mid-sized eCommerce clients’ needs, with 10 GB of complimentary storage.
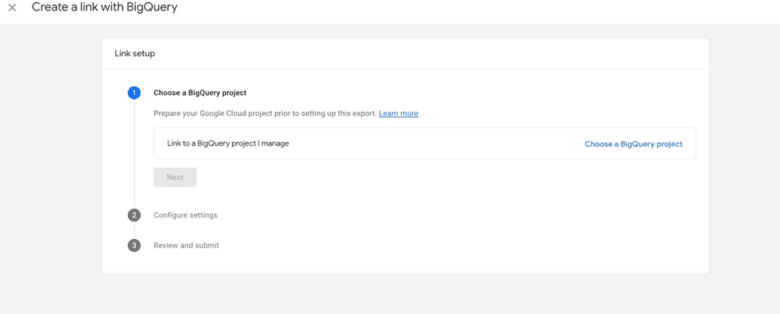
Before you can link this data stream to your Google Analytics 4 account, you’ll need to set up a project for your site. Follow Google’s guide to doing so, then link this warehouse to your GA4 property as outlined below:
In Setup Assistant, click on “Link BigQuery” in the “Linking” section.
Click the blue “Link” button.
Click “Choose a BigQuery Project.” (You may need to search for the Project ID if you don’t see it listed.)
Select the appropriate BigQuery project and then click “Confirm.”
Select the data location (your GA4 property name).
Select the data streams and frequency. We recommend leaving your frequency set at “Daily.”
Finally, click to the next step, where you can review and submit your data. You will now be able to see your account in the BigQuery Linking page.
Step 3 of the BigQuery linking process.
Step 3: Link Your Existing Accounts.
In addition to linking BigQuery, you’ll also need to link your Google Ads accounts. This will allow your business to take advantage of GA4’s advanced cross-platform data integration and reporting capabilities.
There are two processes involved in this:
Google Ads
In Setup Assistant, click on “Link Google Ads” in the “Linking” section.
Click the blue “Link” button.
Click “Choose Google Ads Accounts.”
Select your account and click “Confirm.”
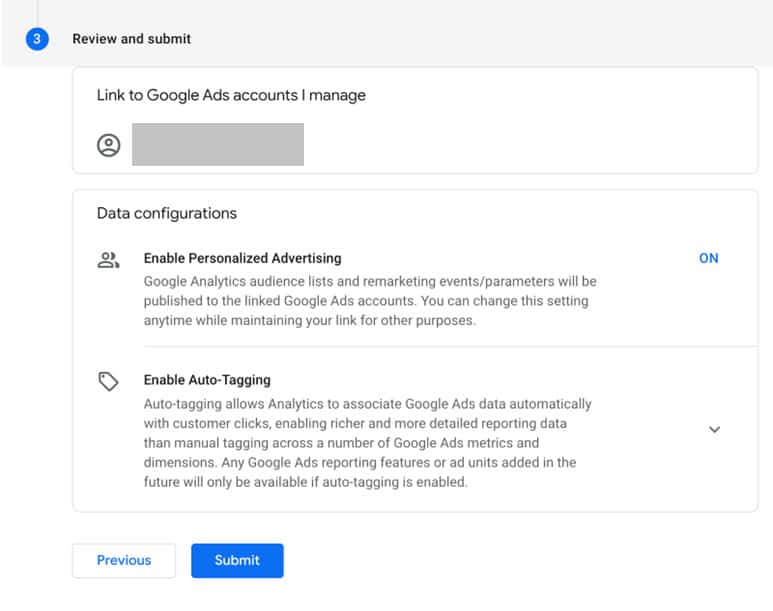
Click on “Enable Auto-tagging.” Select “Leave my auto-tagging settings as they are.”
Click “Next” and then “Review your settings.” Hit “Submit” to finish the process.
Google Merchant Center
If you’re using Google Ads for your eCommerce business, odds are you’re also using Google Shopping.
To ensure your GA4 data gets integrated into your Google Merchant Center, you’ll need to link GMC to your new property with the following steps:
In Google Analytics, click “Admin.”
In the “Account” column, make sure that your desired account is selected. (If you only have one Google Analytics account, it will already be selected.)
In the “Property” column, select the property you want to link to Merchant Center.
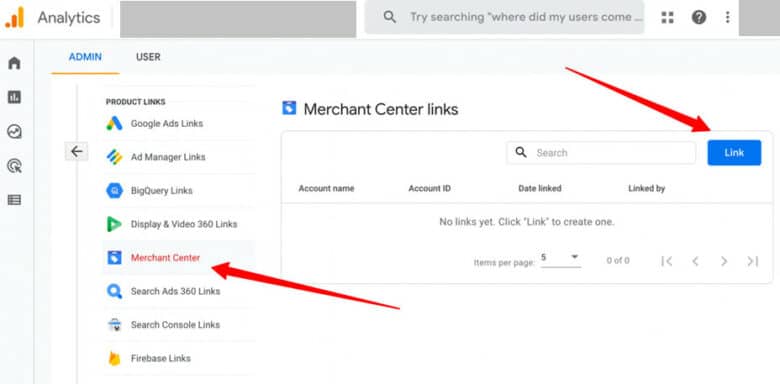
In the “Property” column, under “Product Links,” click “Google Merchant Center Links.”
Click the blue “Link” button.
Click “Choose Account,” and then select the account you want to link your property to.
Click “Confirm.”
Click “Next.”
Under “Enable Auto-tagging,” choose to enable auto-tagging for the Merchant Center account (or leave the settings as they are).
Click “Next,” and then review and submit your configuration settings.
How to Set Up Google Analytics 4 Tracking
Now that you’ve completed the first part of the GA4 setup process, it’s time to get into the nitty gritty of conversion tracking.
Remember, Google Analytics 4 tracks events very differently from Universal Analytics. You can’t just import your UA setup into your tracking configuration; you’ll need to go through the following steps to properly configure your events tracking and ensure your data is collecting accurately.
In the section below, we’ve simplified the tracking process by offering a GA4 eCommerce Tracking Toolkit that your development team can upload quickly to your site.
To get your Google Analytics 4 tracking to fire, you’ll need to use Google Tag Manager to add a custom tag to all pages on your site.
Fortunately, we’ve got you covered with our downloadable GTM container. It contains every piece of tracking code you need to start recording events on your eCommerce site. You can simply download it, import it, and configure it in a few steps.
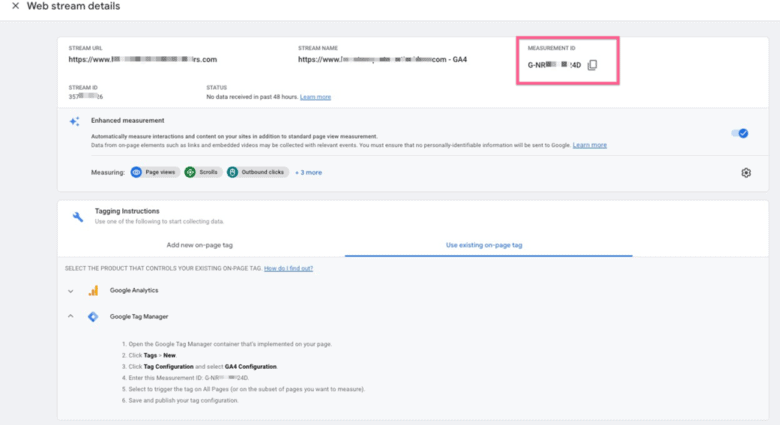
You’ll find your unique measurement ID in Google Analytics 4. In Setup Assistant, navigate to “Tag Installation,” click on your web data stream, and then locate your ID in the upper-right corner of the page.
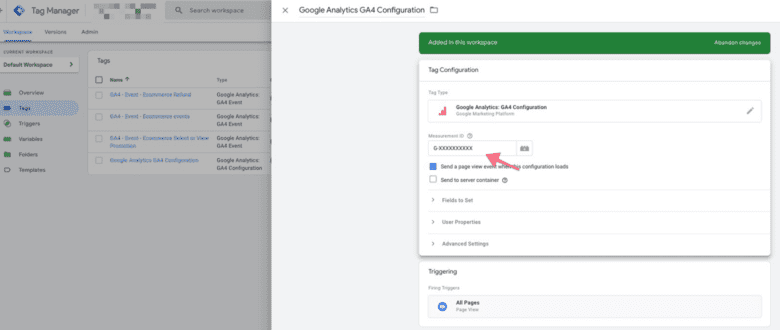
Add this measurement ID to our GTM container. You’ll also need to add this ID to your GA4 configuration tag.
Then, the container and tag will be ready for installation on your website.
Step 2: Set up non-eCommerce Conversion Tracking.
From a non-eCommerce perspective, setting up conversion tracking in Google Analytics 4 can be fairly straightforward. We recommend identifying any applicable events and conversions in your Universal Analytics properties (again, saving eCommerce events for the next step) and making a list of those you feel comfortable replicating in Google Analytics 4.
Make sure to ignore events that are now automatically tracked — scrolling, outbound clicks, and more. In addition, “path”-type goals likely won’t need to be replicated for your site.
Once you’ve identified the metrics you need to track, you’ll want to set these up in Google Tag Manager using the Google Analytics 4 Event Tag type.
Don’t forget to mark these events as “conversions” in the Google Analytics 4 interface when you’re done, if any of these events qualify as conversions.
If your site is eCommerce, you’ll need custom tracking to gather data for all of your eCommerce site events. Fortunately, when you use our GTM container, this step becomes much simpler for your development team.
In essence, all they’ll need to do is code our GA4 Data Layer into your website. This data layer communicates to Google Tag Manager what eCommerce-related events are happening on the site. (This includes actions like purchases, add-to-carts, refunds, etc.)
Adding the data layer code should be fairly straightforward for most eCommerce platforms. Our development partners typically report 5–10 hours of work needed to complete it.
If you’re using a platform like Shopify, WooCommerce, BigCommerce, or Magento, you might consider using an app or extension to install the GA4 Data Layer on your site, instead.
Download Our GA4 eCommerce Tracking Toolkit now.
Set Up Your GA4 Tracking Now for More Data Tomorrow
While you technically have until July 1, 2023, to set up your Google Analytics 4 account, we recommend doing so much sooner than that. The earlier you upgrade to GA4 and start tracking your website data, the more historical data you’ll have when Universal Analytics meets its end.
In addition, because Google Analytics 4 is a completely different beast than Universal Analytics, starting your configuration now gives your team more time for trial and error, to learn the new platform, and to parallel track for accuracy of data.
As mentioned above, GA4’s Setup Assistant is a great place to start — but it can’t provide the detailed, personal instructions that your eCommerce business needs. For that, we recommend working with a digital marketing agency like Inflow, which can customize your migration process and ensure all of your tracking is correct long before next summer’s deadline.
Learn how our team can help you by requesting a free proposal today. In the meantime, review our other helpful guides on Google Analytics 4:
It’s the middle of the day, you’ve got a creative project due tomorrow, a mile-long to-do list, and for some reason, your mind can’t focus. There’s just a blank computer screen looking back at you waiting…waiting for you to be the creative genius you a…
It’s the middle of the day, you’ve got a creative project due tomorrow, a mile-long to-do list, and for some reason, your mind can’t focus. There’s just a blank computer screen looking back at you waiting…waiting for you to be the creative genius you are. When you find yourself tapped out of creativity and on the edge of burn out that means your creative battery needs to be recharged ASAP!
If you’re going to create winning customer experiences for global brands, then be a team player, enthusiast, and leader. It’s not enough to know your role, deadlines, and deliverables. Everyone on the team needs regular access to the playbook and the f…
If you’re going to create winning customer experiences for global brands, then be a team player, enthusiast, and leader. It’s not enough to know your role, deadlines, and deliverables. Everyone on the team needs regular access to the playbook and the freedom to question and contribute.
Here’s how strategists and creative teams can work together successfully — without anyone calling a timeout.
Recently Merkle was named a Leader in data strategy and activation, one of only two companies. We’re proud of this accomplishment and want to share some of the best practices that we’ve found when building a better data strategy. Today, there are many …
Recently Merkle was named a Leader in data strategy and activation, one of only two companies. We’re proud of this accomplishment and want to share some of the best practices that we’ve found when building a better data strategy. Today, there are many challenges that organizations must tackle– like rapidly evolving privacy regulations on data collection, and big tech’s walled gardens that continue to grow higher.
Is CRO worth it for your business? Learn more about the costs involved and average eCommerce pricing to make the best choice for your website.
When it comes to digital marketing strategies for your eCommerce site, perhaps nothing provides as much of a return as conversion rate optimization (CRO). In fact, one study estimates that return at an average of 223%.
But, when you’re already investing in tactics like SEO, PPC, and social media marketing, finding room in your budget for a comprehensive CRO strategy can be difficult — even more so when you don’t know what to expect.
In this guide, we’ll help you better understand the facts and figures behind this marketing tactic. By the end of this piece, you’ll have a clearer answer to the question, “Is CRO worth it for my business?” — so you can make the best business decision for your eCommerce store.
Get ready to learn:
How much different CRO options cost
Which factors will impact your overall pricing
And whether this investment is worth it for your business
Although we’d love to talk dollars and cents off the bat, the truth is that it’s frankly impossible to say exactly what your CRO efforts are going to cost.
That’s because no two CRO projects are the same.
Depending on your website, your products, and your target audience, wildly different efforts may be necessary to generate the results you’re looking for.
For some eCommerce sites, the solutions are very basic, like relocating the add to cart button. For others, it can be something more nuanced, like building trust in your target audience through long-term marketing campaigns and site updates.
Let’s consider two examples from our client list:
Quick and easy fix: TrailCamPro was able to increase its sales by 20% by prominently posting free shipping and return notifications. Prior to this update, customers didn’t know the company even offered this feature; their new knowledge of it was quickly reflected in the revenue increase after our update.
More complicated, long-term project: For Mountain House, our team leveraged user-generated content (UGC) to ultimately increase sales by 13% — but finding out where that social proof should be positioned took several tests (some of which resulted in smaller lifts, no lifts at all, or even a decrease in sales).
To create the most effective eCommerce conversion rate optimization strategy for each client, many agencies (including Inflow) offer a range of services. You’ll need to understand what these are and how they work before you can start comparing costs from agency to agency.
Here at Inflow, we offer two types: a one-time audit and a continuous testing program.
1. CRO Audit
An eCommerce CRO audit is a one-time investment that reveals your site’s biggest opportunities for improvement — and, in most cases, the less expensive approach to conversion rate optimization.
It typically includes four steps:
Understanding your business
Auditing your site
Presenting recommendations
Reviewing site changes before launch
While an audit always involves a personal review of your site, many recommendations are made based on an agency’s running list of industry standards. For example, Inflow’s CRO experts have spent hundreds of hours creating a Best in Class list of practices, which guide all of our client work.
Using that list, we evaluate every single page template of your site (homepage, category pages, product pages, etc.), reviewing metrics and factors like:
Bounce rates
Cart abandonment rates
User experience (UX) features
Calls to action (CTAs)
Chatbots and live chat
Site coding
Product descriptions
Product images
Checkout processes
Customer reviews
Pop-ups and banners
Shopping cart pages
And more
Then, our team delivers a list of one-time recommendations for your site, including the changes most likely to result in significantly higher conversion rates.
It’s important to remember that a one-time audit does not include A/B testing, which can often be the secret ingredient for maximum improvement.
Still, a one-time CRO audit might be best for your eCommerce website if you:
Have a very low conversion rate
Have never had an outside CRO audit
Don’t have enough traffic to justify monthly CRO efforts
In short, a CRO audit is a great choice for small or medium businesses that are looking to improve their profitability on a budget — or, on the other hand, bigger brands looking for optimization opportunities that they can test and implement with their own in-house team.
2. Continuous Testing
In contrast to a one-time CRO audit, a continuous testing program involves ongoing A/B tests to improve conversion rates for site visitors.
With this kind of program, strategists continuously run multiple tests on your website, tweaking your CRO strategy in real-time for steady improvement.
While these services are more expensive, it’s worth it, especially for larger eCommerce websites. You’ll see significant and steady improvement in your sales through the program, as your experts hone in on your customers’ experience and their unique online shopping behavior.
Dollars & Cents: What You Can Expect to Pay for CRO
Now that you know what CRO services entail and why they vary from client to client, it’s time to get into the numbers.
Using our own package rates and those from competitors in the industry, we’ve compiled typical conversion rate optimization prices below, based on a few specific business factors:
Ongoing CRO Testing
Tier 1: $3,000–$6,000 per month
Website size: Small or mid-size eCommerce sites
Monthly traffic: 50,000+ visitors per month
Annual revenue: $10–30 million
Tier 2: $6,000–$10,000
Website size: Mid-size or large eCommerce sites
Traffic: 1+ million visitors per month
Annual revenue: $30–50 million
Tier 3: $10,000–$30,000 per month
Website size: Enterprise-level eCommerce sites
Traffic: 100+ million visitors per month
Annual revenue: $50+ million
Remember, the more complicated your project, the more you can expect to pay. If your scope of work is less (or more) than an agency’s typical engagement, your program costs will reflect that.
The best way to really understand how much CRO costs for your needs is by requesting quotes from several professionals. You’ll get a better idea of how far your budget will go — and what kind of results you can expect for those services (more on that later).
One-Time CRO Audit
Typically, an a la carte CRO audit costs between 150% and 300% of an agency’s typical monthly fee. However, additional services may increase that project cost.
Let’s say you choose to conduct user testing during your audit. User testing can be done cheaply (with a DIY method) or in an expensive manner (with a live test lab and costly staff and equipment). For example, a program like Foresee Results — which collects feedback from live website visitors to “audit” your site — can easily cost upwards of $50,000, depending on your site size.
Like with an ongoing CRO testing program, you’ll need to request quotes from several professionals for an accurate pricing estimate.
The 3 Main Costs of CRO
So, why does CRO cost so much?
Like with most digital marketing services, there are three important factors that influence a CRO program’s pricing.
1. CRO Professional
You have several options for your CRO professional. You could choose to use an agency, hire an outside contractor, or run some initial tests in-house.
As demonstrated above, a digital marketing agency is often the most expensive of these options — but for good reason. An agency maintains a team of trained CRO specialists, who perform website tests day in and day out. They’re up to date on the latest industry trends (thanks to working with so many clients), and they’ll bring that knowledge to your engagement.
For this reason, an agency typically provides the most bang for your buck. While pricier than your other options, the detailed and experienced services are more likely to result in a substantial revenue increase.
If your budget isn’t ready for the commitment of an agency program, you have two other options:
Contractor/Freelancer: Most CRO contractors work on an hourly basis, and you’ll find a wide range of options for your budget. However, you get what you pay for here. Be wary of any consultants charging extremely low rates (anything under $50 an hour); they may not have the experience needed to manage a comprehensive testing program or deliver real results for your business. Instead, look for contractors with a substantial portfolio and a detailed proposal for your site. Typically, these experts can cost anywhere from $150 to $300 an hour.
In-house: If your budget is severely limited, we recommend saving your money and running a few tests on your own instead. Recognize that your results will be limited with this option, too, and you’ll still need to pay your development team and for a testing program (read more below). There are a few ways you can develop your test ideas:
Because CRO can be a hefty investment of both money and time, consider all of your options for improving your eCommerce website’s profitability before committing to a CRO solution. Always review a few competing agencies, as well as freelance options, before signing any contract.
2. Testing Tools & Software
In order to successfully run CRO tests, you need a testing program. These programs and tools can sometimes cost thousands per month, but they’re crucial for delivering statistically significant results.
A testing tool allows your CRO professional to test several site changes at the same time without harming your current user experience. For example, a testing tool can present two separate calls to action to your site visitors. By displaying these simultaneously to a subset of your audience, the tool eliminates as many confounding variables as possible.
Like the price of CRO agencies, the price of your CRO testing program will vary based on your site size and needs. Many offer custom subscription plans built specifically for your business.
Adobe Target (price upon request, customized for site size)
Keep in mind: Many CRO agencies will require you to cover the cost of these external tools (in addition to their own service costs), so they can test and implement changes on your site. But, here at Inflow, we use a proprietary A/B testing tool to build tests directly into your site — no extra fees required.
Therefore, make sure to discuss any testing program fees as part of your CRO agency evaluation process.
Note: A testing program is often not required for a CRO audit. If you choose this service option, you’ll save your team thousands of dollars in expenses.
3. Development Work
Finally, you need to consider the costs of hiring a development team (or increasing the engagement for your existing team).
Depending on your choice of professional, it may be your responsibility to implement changes to your site during tests and after those tests are complete. Not all agencies or contractors have the capability to complete this step for you, which will add another cost to your total price.
As you’re considering a CRO testing program, talk with your development team. How much extra bandwidth do they have? How much will those extra services cost?
Figure that into your decision-making process.
Is CRO Testing Worth It for Your Website?
Bottom line: CRO testing is an investment, which means your website needs to be ready to profit from this venture before you get started.
Therefore, CRO testing is usually only a good choice for mature eCommerce businesses that not only have a good sense of their customers but also know how to bring in enough shoppers and sales to be profitable in the first place. The more stable your site revenue, the more likely the high investment cost of CRO will be worth it — and will be able to drive the results you’re looking for.
When considering CRO services for your business, remember to ask yourself these questions first:
1. Is your online store generating enough traffic and sales?
CRO agencies need substantial traffic to run tests on a site — and enough baseline conversions from that traffic to provide statistical significance for the results.
Typically, we recommend sites should only consider CRO when they have at least 50,000 monthly website visitors and at least 100 monthly conversions.
If your site has less than that, the money spent on a testing program simply won’t be worth it. You won’t be able to generate statistically significant results, and you’ll be better off simply following CRO best practices (without the A/B testing portion).
2. Is there space in your marketing budget?
If you want the best results from a CRO project, the best choice is a continuous testing program. However, if you don’t have the budget for a six-month commitment, consider a one-time CORE audit.
Either way, be prepared to invest in your CRO — not expect a “get rich quick” solution. If you’re struggling to afford the costs of CRO in the first place, you won’t have the flexibility required to support the scaling up and down of your scope of work, not to mention the additional software and development costs involved.
3. Are you willing and able to make changes to your website?
Successful CRO depends on making changes to your website to make it more friendly for potential customers.
If your website can’t be easily changed (maybe stakeholders are committed to its current design or administrative control makes updates hard), a CRO program is not the right choice for you. Similarly, if you have no room in your budget for increased work from your development team, all the tests you run will be for naught.
4. Are you ready for a long-term investment?
Like many digital marketing strategies, CRO is all about the long game. The right program will slowly convert more customers over time to steadily build up revenue increases.
Yes, you can expect to see significant results within six months — but those results will accrue slowly, not suddenly spike.
The longer you stick with CRO, the more stable those results will be, helping your brand become more profitable over the long term. For example, Inflow’s clients see an average of 20-30% increase in sales within six months of using our continuous testing service, with more substantial results for longer engagements.
Get Custom CRO Pricing Today
If you’ve answered “yes” to all of the questions above, it’s time to start researching and pricing out your potential options. See where you might carve money for CRO out of your marketing budget, and review our case studies to see just why that money might be worth it for your brand.
Whether you’re ready to start a CRO program or simply want to know more about Inflow’s pricing structure, our team is always happy to help. Request a free proposal now to get started.